I’ve always wanted to have my very own cocoa tree (also know as cacao). Not really possible in England, although I couldn’t contain my excitement during my recent trip to Hawaii, when my mum told me that a friend of theirs, up the road, had his own cocoa tree! We were gifted some of the pods and set about to process our very own cocoa. I was wildly curious about the whole thing and took photos of the various stages along the way…
This was our first cocoa tree experience, so I am by no stretch of the imagination an expert, but thought I’d share the journey because it is just so much fun to create your own chocolate from tree to belly!
This is the exci ting moment when our friend selects us some ripe cacao pods from his tree.
I am in total awe that people can actually grow their own cacao trees. I imagine, that most trees just sit there without ever being harvested. The ease of being able to buy products in the store makes it much less desirable for people to spend time process their own. Me, on the other hand, could not wait to de-pod, roast and create my very own ethical ‘local’ chocolate! Or at least give it a go.
Unfortunately 99% of the world commercial cocoa bean is unethically produced with an emphasis on child slave labour. Because of this sad, well documented fact, I always buy the most ethical, fairtrade sources that I can find to make sure I am not supporting these inhumane practices; and I urge anyone reading to do the same. Or alternatively, if you are fortunate to live in a climate where chocolate trees grow, then grow then pick and process your own. Nothing beats harvesting your own from an ethical point of view. So, I was totally thrilled at the thought of getting our own pods.
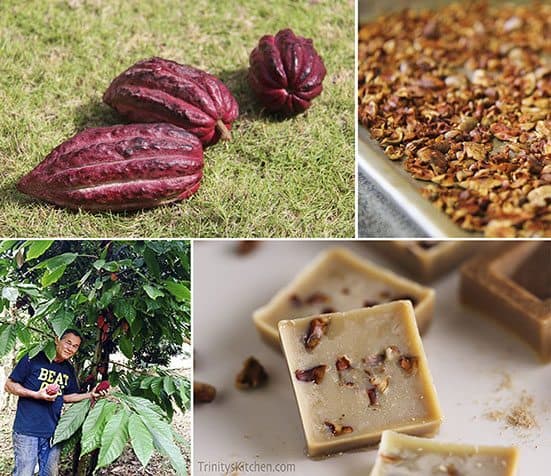
Our very own cocoa pods
They come in different sizes and colours, depending on which variety you get. Young cocoa pods come are most often green, red, or purple, and as they ripen their color apparently often turn yellow or orange. Ours were this gorgeous crimson red.

It’s possible that ours were ever so slightly on the young side, although we were short of time and couldn’t bear to wait a moment longer to look inside…

A peek inside
I sliced right through half of the first cocoa pod with a strong, sharp knife to see a cross section. We found about 32 cocoa beans in each pod.

Getting the beans out
The pod is full of a soft, white, fruity, mucilaginous pulp that protects, nourishes and encases the cocoa beans. I think if we’d had the time to let these ripen just a little bit more then the inner pulp would have been more slimy. I get the feeling from other photos I’ve seen, that the insides vary from variety to variety too. We used a small sharp knife and our fingers to pop them out. It was a fiddly job to start with, but got so much quicker as we progressed.

Was not expecting them to look like this
The actual cocoa beans were a creamy white colour with hints of lavender. Any bruised or chopped part of the bean rapidly oxidised, turning to a brown colour. They sort of reminded me of mini ‘brains’… (lovely I know!)… and if nature is anything to go by, that means they should be good for the brain, so bring ’em on. Really wasn’t expecting them to look like this raw… I was expecting them to be dark brown. I felt so honoured to see behind the scenes of the cocoa bean world and be de-podding my very own.

After a bit of web searching to try and find some clear information about processing your harvest of cocoa beans, we didn’t really get anywhere and continued ‘winging it’ and making it up as we went along. I am definitely getting better results on my web searches here now that I am back in the UK though. Funny that!
Fermenting beans first (unless you are in a hurry)
I’ve read that it is important to ferment your beans with the white pulp outer-layer still intact. The length of time you are meant to ferment for this varies between each variety. Fermenting is said to help the cocoa beans develop more body and a richer flavour. There is a real art to this process. However, we’d received our pods near the end of my trip and time was short; so without clear guidance (or enough time), we left the beans on the counter top for a day and then decided to break them down into cocoa nibs and roast them in the oven without fermentation. We put them in at 300F for about a half hour (until they’d lost their whiteness and all seemed gently tanned), as the next photo shows.

A majorly exciting moment!
We had our own cocoa nibs and they tasted REALLY GOOD (well, if you like that bitter nib taste like I do).
At this stage, if you have the right equipment, I have heard that you could separate the cocoa oil from the nibs. We didn’t have the right equipment, so I simply ground some down to create cocoa powder, using a seed mill.
Making our own Hawaiian, Kauai grown chocolate
After melting down some store bought cocoa butter (a high quality health food store bought variety); popping in some maple syrup/coconut sugar and adding a dash of vanilla extract… I created my own, home-made, Kauai grown cocoa chocolate.

It’s light, creamy and I absolutely love it! It looked a little lighter than my usual chocolate and left an ever so thin layer of white chocolate right on the top (which I guess was due to separation). A few home made Kauai cocoa nibs sprinkled on top and it turned out to be a very poetic and artful experience.
I have so much more to learn about this and am excited to explore further another time.
Trinity
x
A final note…
If you are interested in learning making your own chocolate at home, from scratch, then check out my step by step video guide here:

Thanks so much for sharing, Trinity. I’ve never seen the making of cacao nibs — so interesting! I had no idea that’s what a pod looks like.
And thanks for the fair-trade reminder too
It was so much fun Audrey – I just had to share 🙂
Wow, I wasn’t expecting the cocoa beans to look like that or how big the pods are. 🙂 Now dreaming of warmer climates… x
Hey Amy – great to hear from you here.
Yes, was fascinating to see what they were really like from the tree. Blessed are we to see!
x
Hola Trinity! I want to make chocolate like you show in the video, please tell me what kind of chocolate i get by following this receipe? I dont like more than 60% cocoa…you know what I mean right? Not bitter, i like it sweet but cocoa taste. Thank you for teaching me so much! Bless you
Hi Claudia,
Chocolate making is so exciting. You can find some suggestions about which cacao to buy in this link: https://www.kindearth.net/raw-vegan-chocolate-recipe-video-a-step-by-step-guide/
People who don’t usually like bitter chocolate, almost always love this type.
Trinity
x
Hi Trinity,
I would love to buy a few seeds from your friend’s tree, if possible. I’m collecting a variety of trees, but I don’t have pods like that, yet. I’m on the Big Island of Hawai’i.
Don’t homemade nibs taste the best? I love mine the most, and don’t mind at all if other people disagree with me. 😉
Mahalo nui!
If I was there I’d be able to send you some. I am in the UK now though, where I live.
Love
I live in Hawaii, but at too high of an altitude to grow cacao. I just bought a cacao pod at Kealakekua Ranch market, and I’m going to let it ripen fully and ferment, before I try to roast and grind it.
Do you sell cacao pods?
No I live in England – the above post happened on a trip to hawaii 🙂
Waoo, Thank you for this exposé. I am from Africa. Millions of tonnes of Cocoa seeds are exported out of Africa yearly and millions of tonnes of Chocolate are imported, yet most of us here can’t just imagine how Cocoa seeds are converted to Chocolate. You have saved a nation with this video.
Thank you for this information.I just bought 2 cacao tree seedlings and I am going to plant them.Never new all this.Good to learn