
Once upon a time, I thought it would be fun to make spring rolls. Naturally, as common sense would have it, I followed the instructions on the rice paper wrap packet. Pretty simple you would think. Nope, actually, it was not. They were a bit hit and miss. More often than not the instructions would make me soak for too long turning the rice paper wrappers into a soggy mess. Sometimes the ingredients would simply tear through the wrap, making the whole affair a bit disappointing. All I wanted was to make rice paper wraps that worked.
Alas, not one to give up easily I decided, to figure it out myself because I knew that there were places in the world (probably not England haha) where people were making top-notch, ‘work-every-time’ spring rolls. And I ain’t settling for anything less than ‘top notch’ work-ever-time spring rolls.
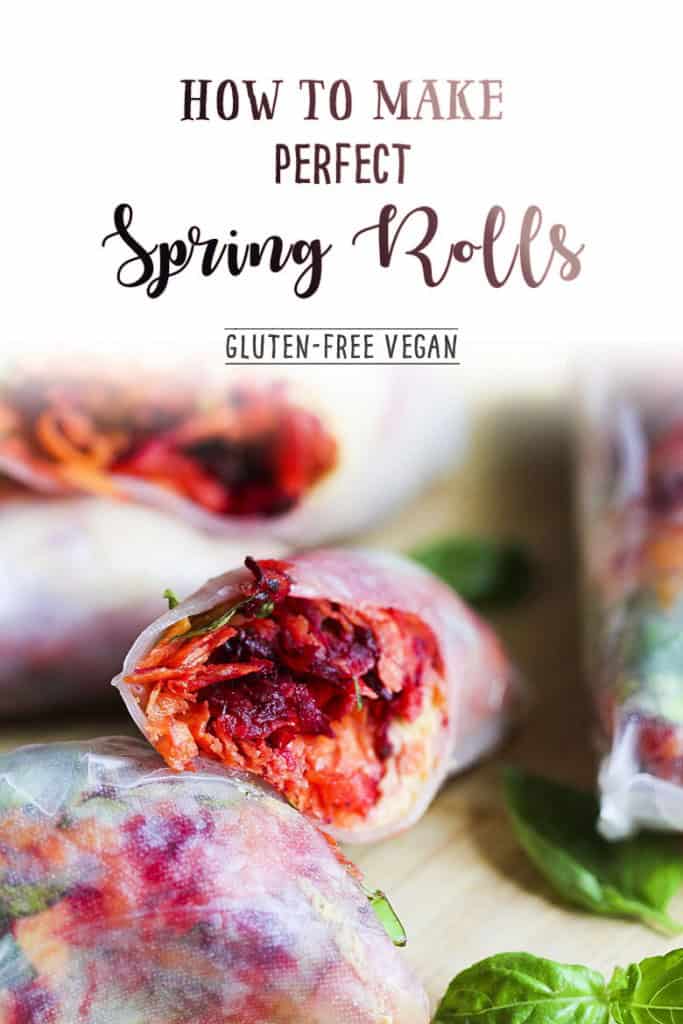
I’ve figured rice paper wraps out and they work every time
Oh my goodness, it was fun exploring and experimenting and playing in my kitchen. It makes perfect sense once you tune into rice paper and how it wants to work. So, I figured it out and today I am sharing a fab way to make them with you.

Top tip to make rice paper wraps
Part of the secret is in DOUBLE wrapping your spring rolls. Rice paper is so thin that it tears very easily. Double wrapping instantly gives them enough strength to contain a generous amount of fresh ingredients.
The other important thing is SOAKING FOR JUST THE RIGHT AMOUNT OF TIME. When dry, the rice paper is solid and brittle. When soaked the rice paper quickly becomes soft and pliable. You need it to soften in order to make it wrap-able. However, if you soak it for too long it all collapses in on itself and becomes a soggy mess…. and we don’t want that haha.
It really is simple though.
If you soak for just the right amount of time, then you’ll create perfect spring rolls.
The right amount of time varies depending on the brand. Generally, you need to soak for a few seconds, sliding the rice paper through the water, patting down, flipping over so you soak for a few seconds only on each side, making sure everything is gently soaked.
So the first thing is to make sure that we have an overlap with the rice paper. Here (see the following photo) is what I mean (using the rice paper before it has been soaked). You need to make a figure of eight shape with an overlap in the middle as shown in this picture…

Soak the rice paper – but only for a few seconds
Then you need to get a tray. A baking tray with shallow edges is ideal. Put tepid water in it (not too hot, not too cold) and then run the rice paper through it for a few seconds on each side, making sure it fully soaked. You definitely don’t want to let it soak for too long (it should be soft but STILL holding its round shape).
You will need to do this with two wraps and place them in a figure of eight on a very clean kitchen work-top surface. The moisture will keep softening the wraps once you have placed them down. You will need to work quickly at this stage. If you wait too long then the wraps will become difficult to work with. So make sure you have prepared your fillings ahead of time and have them waiting there on the side. ***Watch my video to see how I do it – scroll down for video***

Make rice paper wraps with a delicious filling
Next, you will need to fill your wraps by placing your chosen ingredients in the centre of the wrap nearest to you. Ingredients can vary. You will need to include one pate or a dip like hummus.
Other great filling ingredient ideas include salad greens, raw-slaw, grated veggies, thinly chopped carrot, celery, sweet pepper, fresh herbs like basil, coriander leaves, parsley, quinoa salad. Add seasoning if needed too.

You’ll need to quickly wrap the rice paper
As soon as you have placed your filling then you will need to quickly wrap. I highly recommend that you watch my video below to see how I do this.
Essentially you need to pull the rice paper over the top and tighten it down onto the veggies. Then you need to take the sides and wrap them over…

Then keep wrapping the sides, rolling the rice paper, wrapping the sides, rolling the rice paper – and repeat until it’s all wrapped up nicely…

And there you have it… delicious spring rolls made with rice paper
If you are serving on a plate for lunch then take a sharp knife and slice through on a diagonal angle and enjoy. If you want to take in your lunch box, then simply keep them as they are without slicing in half.
Lightly wrap them in parchment paper if you are concerned about them sticking together in your lunch box.

If you use thinly sliced veggie sticks (such as carrot, sweet pepper, cucumber, celery) then be sure to place them all at the same angle before you roll.

Here is a video that I made to take you through this step by step. It will really help if you take a few minutes to watch this demonstration before making your rolls. It is a great visual guide to show you how easy they are…

Perfect Spring Rolls (rice paper wraps)
Making spring or summer roll rice paper wraps couldn't be easier with these simple steps.
Ingredients
- Two rice paper wraps (per spring roll)
- Two tablespoons hummus (per spring roll)
- A handful of green leaves
- A handful of raw-slaw
- A sprinkle of sea salt
- A sprinkle of pepper
- (see note for many other filling variations)
Instructions
- Please watch my video above for a very helpful guide on how to make these (it’s easier to show visually than explain in writing with these wraps).
- Prepare any fillings that you will be using and place them on the side. You will need at least one pate or dip such as hummus and any of the following… raw-slaw, grated veggies, fresh herb leaves, salad greens, tofu, cooked beans, rice salad, quinoa salad, finely sliced veggie sticks and seasoning to your preferred taste.
- You will need a tray. A baking tray with shallow edges is ideal. Put tepid water in it (not too hot, not too cold) and then run the rice paper through it for a few seconds on each side, making sure the rice paper fully soaked. Don't let it soak for too long (it should be soft but STILL holding it's round shape).
- You will need two wraps for each ‘wrap’ that you are going to create. After soaking each wrap, place flat on a clean kitchen work-top surface creating a figure of eight shape with an overlap in the middle. The moisture will keep softening the wraps once you have placed them down, so you will need to work quickly at this stage. If you wait too long then the wraps will become difficult to work with. So make sure you have prepared your fillings ahead of time and have them waiting there on the side.
- Place a generous helping of hummus or pate along with veggies or slaw into the centre of the wrap closest to you (see video or photo above).
- Fold the wrap over the veggies and tighten them in together. Wrap over the sides and roll. Keep wrapping the sides and rolling until it is all rolled up nicely. Please WATCH my video for this to see exactly what I mean.
- You can slice through the middle and serve for lunch on a plate. Or pop in a lunch box for later. I often wrap in parchment paper to stop them sticking together.
- Enjoy!
Recommended Products
As an Amazon Associate and member of other affiliate programs, I earn from qualifying purchases.

Spread the love and pin rice paper rolls for later…


This is really good
Thank you, a really useful guide. My wraps leave a lot to be desired!
Happy to hear you find it helpful.
x
Thank you, this is really helpful.
I’d love to get the recipe for the carrot filling you made! Also, any dipping recipes?
Ahhhw glad you like the sound of it. I’ll see if I can post the carrot recipe soon 🙂
This particular sort of medley is designed to be enjoyed without the need for a dipping sauce. I think the sauce is best when they are not flavoured and creamy on the inside. I’ll also try to post a plain spring roll recipe with a dipping sauce though… it had been on my mind, so thanks for the reminder.
Hi, the recipe sounds so good!
Could I also prepare them the day before? Or would that be not a good idea? I really want to bring them to an event in the evening, but I don’t have time to prepare them the exact same day, would it be okay if I make them the evening before?
Hi Julia, thank you for dropping by and I am pleased you are going to make these.
You can keep them overnight if needed. Separate the layers of rolls with parchment/baking paper and they should be absolutely fine.
Enjoy!
Anastasia x
Very good tutorial for using rice paper.